
Android Native Development Kit (NDK) is a collection of tools inside Android SDK that enables integration of C/C++ code and libraries into Android applications. The term “native” comes from the fact that, in contrast to Java/Kotlin code which compiles into JVM bytecode, C/C++ code compiles directly into native executable code for specific hardware architectures. This makes the compiled artifacts more performant, but less portable.
Use Cases for Android NDK
When you incorporate NDK code into Android applications it adds complexity, increases the size of the resulting APKs, leads to longer build times and makes debugging harder. Therefore, in most cases, you shouldn’t use NDK.
Said that, NDK can come in very handy in the following situations:
- You need to reuse existing C/C++ code or libraries.
- You want to achieve better code obfuscation for sensitive features, thus making them harder to reverse engineer.
- You need a very high performance, not achievable on JVM.
If you happen to face one of the above requirements, then read on.
Setting Up Android NDK
To use Android NDK, you’ll first need to install NDK and CMake tools using SDK Manager in AndroidStudio. CMake is a special build tool for C/C++ code.
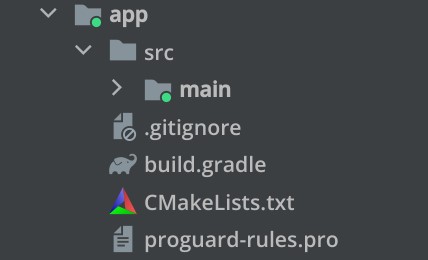
Then you’ll need to add a new CMakeLists.txt file into your project. This is a configuration file for CMake (somewhat analogous to build.gradle for Gradle). While you can add this file wherever you want, the standard approach is to place it into the src directory of the respective Gradle module:
For now, leave the newly added CMakeLists.txt file blank. We’ll get back to it later.
Lastly, add the following code into build.gradle file of the respective module (change the path to CMakeLists.txt if you placed it in a different directory):
android {
    ...
    externalNativeBuild {
        cmake {
            path file('CMakeLists.txt')
        }
    }
}
At this point, Gradle becomes aware that your project makes use of NDK and will execute CMake as part of the build process.
Adding C/C++ Source Code to Android Project
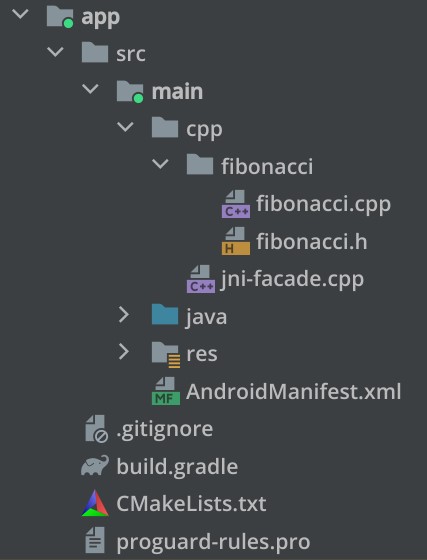
You’re free to place your native source code wherever you want in the project’s directory. The standard approach, though, is to add cpp directory in the main source set of the respective module and use it as a root directory for the native part of your application.
For the purpose of this tutorial, we are going to compute the nth Fibonacci number using NDK. So, let’s add fibonacci.cpp file:
int computeFibonacci(int n) {
    if (n <= 1) {
        return n;
    }
    return computeFibonacci(n - 1) + computeFibonacci(n - 2);
}
Even though something as simple as the above function doesn’t require a header file, let’s add fibonacci.h file just for the sake of learning experience:
#ifndef FIBONACCI_H
#define FIBONACCI_H

int computeFibonacci(int n);

#endif // FIBONACCI_H
Now we have C++ code that implements the required functionality.
Integrating Android Code with Native Code
The next step is to “bridge” between the standard Android code and our newly added native code. This is a two-step process that involves special modifications on both sides of this communication channel.
First, let’s add NdkManager class:
package com.techyourchance.android.ndk

import ...

class NdkManager {

    suspend fun computeFibonacci(argument: Int): FibonacciResult {
        return withContext(Dispatchers.Default) {
            computeFibonacciNative(argument)
        }
    }

    private external fun computeFibonacciNative(argument: Int): FibonacciResult

    private companion object {
        init {
            System.loadLibrary("my-native-code")
        }
    }
}
This class will be the facade for the native features on the Android side. Several things to note here:
- The full package name of this class is important and will be referenced later.
- I use Coroutines to avoid calling native functions from the UI thread. You can use whatever multithreading approach you like.
- A special
externalfunctioncomputeFibonacciNativeis a placeholder for the corresponding function frommy-native-codelibrary that I load whenNdkManagerclass is initialized. - Even though
computeFibonacciNativewill be implemented in the native code, its return value is a data structure defined on the Android side. Theoretically, the return value could be justInt, but I decided to make it a bit more interesting for learning purpose.
The mechanism that JVM uses to integrate with native features is called JNI – Java Native Interface. The placeholder function computeFibonacciNative inside SdkManager indicates that this class expects to find the corresponding JNI function in the my-native-code library. To satisfy this requirement, let’s add jni-facade.cpp file and implement the required function there:
#include <jni.h>
#include <fibonacci.h>

extern "C"
JNIEXPORT jobject JNICALL
Java_com_techyourchance_android_ndk_NdkManager_computeFibonacciNative(
        JNIEnv *env,
        jobject thiz,
        jint n
) {


    // compute the result and convert it to jint before passing back to Java
    jint result = static_cast<jint>(computeFibonacci(n));

    // construct an instance of FibonacciResult object defined in Java code
    jclass resultClass = env->FindClass("com/techyourchance/android/ndk/FibonacciResult");
    jmethodID constructor = env->GetMethodID(resultClass, "<init>", "(II)V");
    jobject resultObj = env->NewObject(resultClass, constructor, n, result);

    return resultObj;
}
This class is a facade on the native side of the communication channel. Short summary of what’s going on here:
- The first include statement is required to use JNI features.
- The second include statement brings
computeFibonaccinative function into the scope. extern "C"is a special directive for C++ that disables so-called “name mangling”. Basically, it tells the compiler to preserve the name of this function in the compiled artifacts.JNIEXPORTis a directive that makes this function visible to the Android side.jobjectis the function’s return type (Java object in this case).JNICALLmeans that this function will be called through JNI.Java_com_techyourchance_android_ndk_NdkManager_computeFibonacciNativeis the fully-qualified name (package, class, function names) of the corresponding placeholder function in theNdkManagerclass. This name allows the system to map the placeholder function to this JNI implementation.- The first argument of JNI functions is always
JNIEnvpointer. This object can be used to access various JNI features. - The second argument is always a reference to the caller Java object (in this case – an instance of
NdkManager). - Third and further function’s arguments correspond to the arguments passed from the Java code (in this case, just a single
jint). - C++
inttype and Javaintaren’t the same type. JNI designates Javainttype asjint. Since computeFibonacci function returns C++int, we convert it tojintusingstatic_cast<jint>call. - Since the return type of this JNI function is a Java object defined in Android code,
JNIEnvis used to find that class, identify its constructor and create a new instace. This approach is very similar to Java runtime reflection, but invoked from the native side.
I know that all of this can be a bit confusing at first. As we discussed earlier, usign NDK increases the complexity of your codebase, so now you see what I meant by that.
Configuring CMake to Build the Native Library
Now we have all the required source code on both sides of the communication channel, but if you try to use NdkManager, your app will crash. The error will say that a library named my-native-code wasn’t found. This is the library that NdkManager loads on initialization. What’s going on here?
The answer is simple: remember the CMakeLists.txt file that we added but left empty? This file should contain the instructions for building the required native library. Let’s add them:
# We're required to set some minimum version here
cmake_minimum_required(VERSION 3.18.1)

# Declare a new native library
add_library(
        # Set the name of the library
        my-native-code
        # Designate the library as a shared library (.so)
        SHARED
)

# This helper variable points to the location of the native sources
set(NATIVE_SRC_DIR src/main/cpp)

# Add specific source files to the library
target_sources(
        my-native-code
        PRIVATE
        ${NATIVE_SRC_DIR}/jni-facade.cpp
        ${NATIVE_SRC_DIR}/fibonacci/fibonacci.cpp
)

# Look for header files in these directories
target_include_directories(
        my-native-code
        PRIVATE
        ${NATIVE_SRC_DIR}/fibonacci/
)
I think the comments should be self-explanatory in this case.
Note that the name of the new native library should be the same name that NdkManager loads (i.e. if you change it, change in both places).
The above CMakeLists.txt configuration corresponds to the following structure of the native sources:
At this point, you should be able to compile your application and use NdkManager to compute nth Fibonacci number in native code.
Conclusion
This tutorial should get you started with Android NDK in no time. However, I must warn you that it covers just the very basics of this complex feature. Therefore, if you’ll need to use NDK in your Android applications, I recommend taking the time to understand how it works at a deeper level.
