A couple of weeks ago, Brendon, one of the students in my Android architecture course, asked the following question:
Thanks for putting this course together and I have learned a lot from your philosophy and criticisms. I have finished my course and at time I find it difficult to piece together the puzzle. Can you please put together a UML blueprint diagram that links everything together?
Brendon, I think that this is a great idea!
However, if I’d just show you a complete diagram, it wouldn’t cover all the bases. See, different projects have different requirements, constraints and different levels of expertise on the team. In addition, projects can already have much code in place, so they aren’t in position to refactor towards the “best” approach. Therefore, in this post I’ll show you a series of architectural diagrams for Android applications starting from the “dirties” ones and gradually progressing towards “clean state”.
God Activities and Fragments
I constantly see a huge gap between the level of discussion in the community and the code I see in real projects. The community produces a constant stream of articles and talks about e.g. benefits of MV-something over MV-something-else, while real world projects seem to struggle with much more basic task: how to avoid God Activities and Fragments.
God Activities is what you get when you put too much code inside Activities. [Please allow me to stop mentioning Fragments each time; all I say applies to them equally well]. For example, on one project I’ve joined recently there are MainActivity and ScreenXFragment, each having 5000+ lines of code. It’s 10000+ lines of code in just two classes. I’m sure that many popular applications on Google Play have less code than that!
Since God Activities are so “popular”, I’ll count them in as the first architectural approach. Needless to say (but I’ll say it nonetheless just in case) that this is the worst way of writing Android applications. The toll it takes in the form of development and maintenance effort is huge.
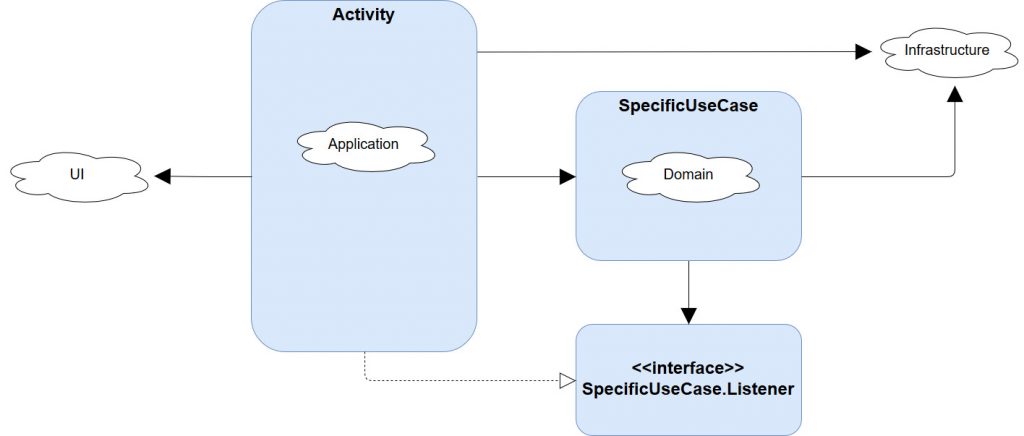
So, this is the schematics of God Activity approach:
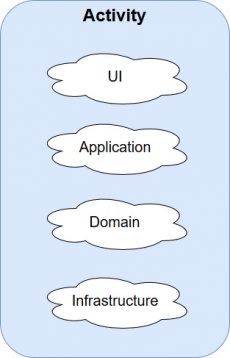
The “clouds” in the diagram aren’t specific classes or components, but rather different types of logic in the application. I’ll describe them in a bit more details later.
For now, it’s enough to understand that you get God Activity when you put all the types of logic into the Activity class itself. To be more precise, in some cases it’s enough to put more than just one type of logic into Activity to make it God Object. However, it’s too early to discuss this point and I’ll get to it later.
So, all this logic inside Activity is a sure recipe for trouble, so we need to extract it somehow. In the following sections I’ll show you my preferred strategies to approaching this task.
Extraction and Decoupling of User Interface Logic
User interface logic is the logic that defines how application looks and captures user’s interaction with apps’ screens.
Decoupling of user interface logic from your Activities is hands down the best investment into long-term quality of the code. The reasons for that are numerous:
- UI logic usually has the most detailed requirements (UI mockups)
- Its rate of change is usually much higher than the rest of the application
- Code that describes user interface is hacky, messy, unclear, etc. (especially on Android)
- Manual testing of user interface logic is easy
- Automated testing of user interface logic is very hard and you can’t test everything
I won’t go into more details here, but you can watch this talk where I explained why decoupled UI is important and how it’s the main objective of all MVx patterns. The bottom line is that you want to decouple UI logic to leverage its good properties while mitigating the impact of the bad ones.
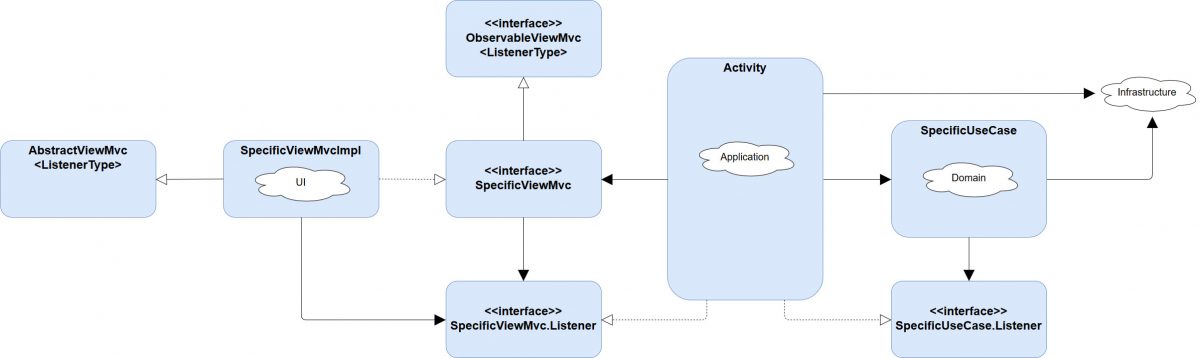
My preferred way of decoupling UI logic is shown on this diagram:
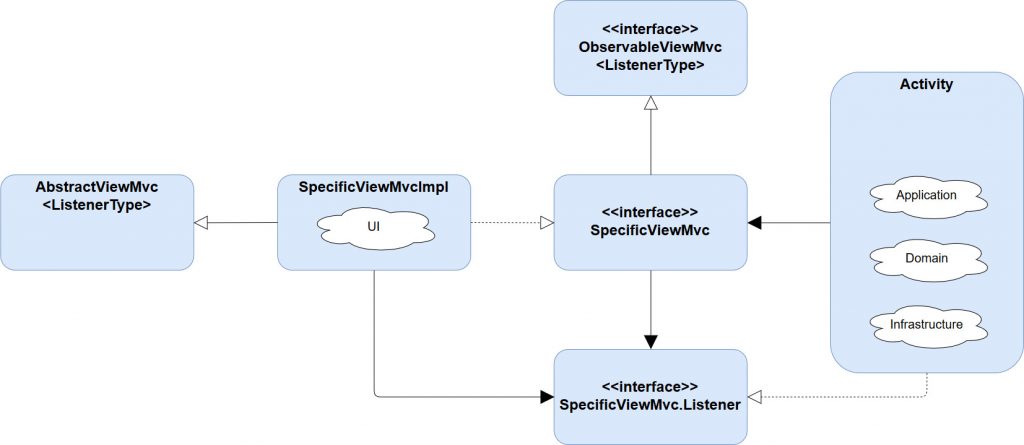
I know that it’s a bit frightening when you see this diagram for the first time and I won’t try to convince you that it’s simple. It’s not. If you find it difficult to understand what’s going on here, I invite you to read my series of articles about MVP and MVC in Android.
Please note that there is no chain of dependencies from Activity to SpecificViewMvcImpl. That’s Dependency Inversion Principle in action (the “D” in SOLID). This allows to swap different implementations of SpecificViewMvc very easily, which can be extremely beneficial (e.g. AB testing of different implementations of a screen).
However, the main reason for presence of SpecificViewMvc interface is not DIP, but readability. As I wrote above, UI logic can be extremely messy and hard to understand. Presence of this interface allows to see the high-level API of the UI logic without going through the ugly implementation details. For example, try to understand what’s the general functionality of this view, and then compare this experience to just reading its interface declaration.
By the way, if you’re wondering why I insist on extracting UI logic from Activity, as opposed to making Activity solely UI component, then do watch the video I linked above, or, at least, read this article.
Extraction and Decoupling of Domain Logic
After extraction of UI logic from your Activities you immediately get rid of the biggest risks and problems. However, this improvement isn’t sufficient all by itself to prevent God Activities and make your code maintainable in the long term. To achieve these goals, you need to decouple your domain logic (also known as “business logic”) as well.
You can decouple domain logic by extracting it into so-called “use cases” (also known as “interactors”). This approach was popularized by Robert Martin with his Clean Architecture (note the capitalization) school of thought and I really like this technique.
[Just a small rant, if I might. Feel free to skip. Most resources about Clean Architecture in Android that I read basically start and end with use cases and “onion structured” diagram of dependencies directions. Both of these are indeed part of Clean Architecture school of thought, but there is much more to it. Unfortunately, as of 2019, Clean Architecture in Android primarily means having some use case classes and that’s it. IMHO, it’s very narrow and unfortunate perspective. For interested developers, I highly recommend Uncle Bob’s book titled “Clean Architecture” which contains much more thorough and consolidated discussion of what goes into clean architecture and Clean Architecture. End of rant.]
With introduction of use cases, the diagram looks like this (I abbreviated the UI part to emphasize what changed):
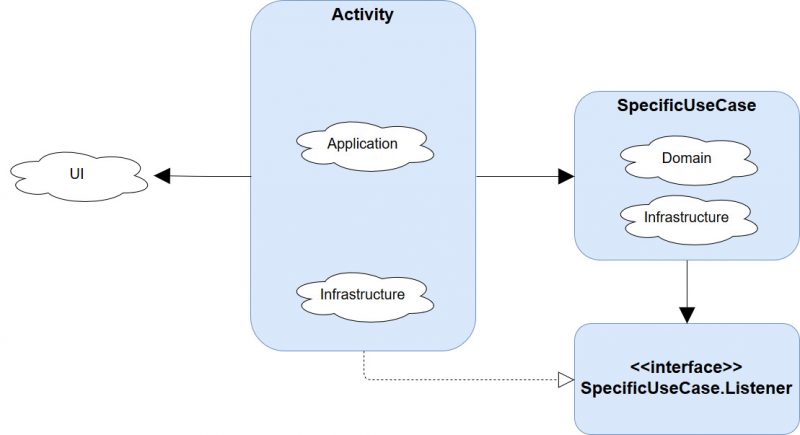
This diagram shows just one single use case, but, except for the simplest screens, Activity will usually depend on multiple use cases and implement the corresponding number of listener interfaces. Now, you might be thinking that I made a mistake in the diagram because I have infrastructure logic in two places. This isn’t mistake and I’ll explain this point later.
A good rule of thumb for use cases design is that they should have just three public methods:
- registerListener(SpecificUseCase.Listener)
- unregisterListener(SpecificUseCase.Listener)
- doSomething([<arguments>])
Each time you’re tempted to add the fourth method to any of your use cases, I recommend taking a moment to think it through. Most likely this will violate Single Responsibility Principle and you can find a better design alternative (e.g. refactoring of the existing use cases or introducing a new one).
Note that I don’t use interfaces for use cases. I just never needed them and I think there is no reason to complicate the code with myriad interfaces having three methods each. Yes, I unit test my code and lack of interface is not a problem.
On the other hand, all the use cases that Activity uses are Observables and deliver their results through interfaces that Activity implements. I do this even for the simplest use cases that execute on the main thread. This way Activity neither knows nor depends on use cases’ multi-threading implementation details and I’m free to change them as requirements change. Some might invoke the Knuth card and point out that this is a preliminary optimization, but it a) standardizes the use cases and b) proved itself very useful because as your application grows many (most?) use cases will become fully asynchronous.
In addition, contrary to a very popular opinion in Android community, I don’t mind using Android classes inside use cases when it’s needed. Sometimes it does make unit testing more challenging or impossible, but I think these are the use cases that you wouldn’t want to write unit tests for in the first place.
Extraction and Decoupling of Infrastructure Logic
In the previous diagram, infrastructure logic appeared both in Activity and use case. Why is that? Well, these components require different types of infrastructure.
Application logic is the logic that “glues” all other types of logic together into a complete application and establishes proper navigation between application’s screens. This type of logic requires infrastructure related to navigation between screens, dialogs management, runtime permissions management, etc. Domain logic shouldn’t need the aforementioned types of infrastructures because they are specific to Android and aren’t related to the business domain of the application. However, domain logic might need infrastructure to persist domain state on disk, get user’s location, offload long running operations to background threads, etc.
However, even though the infrastructure required by different components can be different, it’s a good idea to extract and decouple all of it into standalone classes that have narrowly scoped APIs.
“Infrastructure” cloud on the following diagram represents many functional classes:
Sometimes it might be a bit difficult to distinguish infrastructure logic from application and domain logic. A useful rule of thumb in this case would be: if you think you could re-use this functionality in other applications, chances are that it’s infrastructure. However, don’t be stressed about these cases. If you have really hard time deciding whether to keep something inside use case or make a standalone class for it, chances are that both approaches will be alright.
You might be wondering whether there is infrastructure logic for UI logic. Yes, there is. For example: image loaders, bitmap caches, etc. However, in my experience, usually it boils down to a small set of classes which doesn’t warrant a block on its own.
Clean and Maintainable Android Architecture
Combining all the techniques described above we get what I call MVC. I’ve been using this approach for the past couple of years with great results and I got very positive feedbacks from other developers who tried it. [I call this approach MVC not because I insist that it’s “pure” MVC (if there is such a thing), but because MVC is the most generic name and it was vacant in Android when I researched this topic couple of years ago.]
The general diagram of MVC looks like this:
There are some more fine grained details that can be added to this diagram, but I prefer not to. As I said, in my experience, most Android projects struggle with much more basic challenges than “how to perfect my design and architecture 100%”.
If you bring your project to the above structure, you will be 80% clean, which is absolutely great and you don’t really need more than that:
You Can’t Write Perfect Software. Did that hurt? It shouldn’t. Accept it as an axiom of life. Embrace it. Celebrate it. Because perfect software doesn’t exist. No one in the brief history of computing has ever written a piece of perfect software. It’s unlikely that you’ll be the first. And unless you accept this as a fact, you’ll end up wasting time and energy chasing an impossible dream.Andy Hunt, The Pragmatic Programmer
Where is Controller?
I imagine some of the readers will be a bit confused right now because I call the above pattern MVC, yet there is no controller on the diagram. There is a view, and we can think of use cases as a model (or you can think of app’s state as a model; choose the mental model that feels more natural to you), but there is no controller. Unless…
Yes, Activity is the controller. Surprise, surprise. [I remind you that everything you read here applies to Fragments as well]
I won’t go into much details and explanations here, but you can watch this video (the same one I linked above) or read this post (also linked above) to understand why Activity’s natural role is to be the controller.
The only issue here is that Activities aren’t unit testable, but it’s very important to unit test application logic. So, what can you do about this?
Well, just like neither the view nor the model is a single class, the controller can be composite as well. Enter standalone controllers:
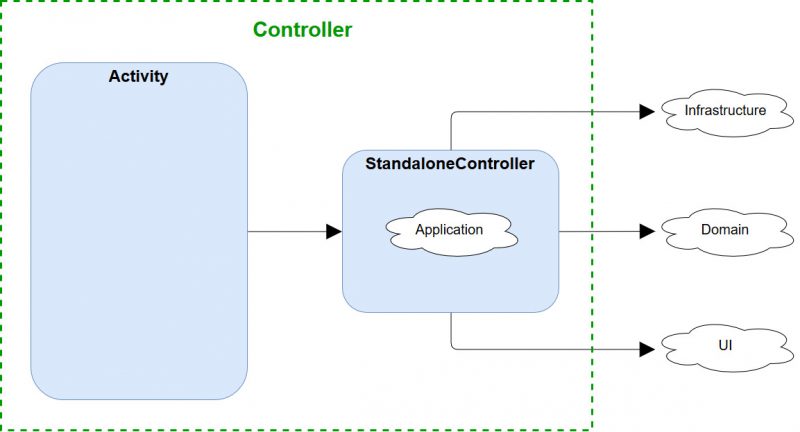
I always prefer to have one controller (either Activity or standalone) per screen, but nothing restricts you from having more than one.
For example, you can have multiple Fragments displayed simultaneously, or, just like Netflix do in their Android app, you can have multiple standalone controllers. I don’t like the additional complexity associated with having multiple controllers per screen, but in some cases it might be a reasonable trade-off.
As for whether standalone controllers are mandatory, I think they aren’t. The moment you extract UI and domain logic from your Activities, it becomes immediately clear that they are controllers. Standalone controllers introduce a bit of indirection and complexity that isn’t justified, unless you’re unit testing your code. Therefore, if you aren’t doing TDD, I don’t see a reason to use them.
Why TDD? Because let’s be honest: “we’ll unit test this class in the future” never happens.
Summary
I hope you enjoyed reading this article and it made you think about the architecture of your Android applications.
The discussion here was at quite high level of abstraction and you might have many questions at this point. Unfortunately, it’s impossible to get into the details of such a huge topic in a single post. Good news are that I produced lots of high-quality content about all this over the years and much of it is linked above.
In addition, if you haven’t already, I highly recommend taking my course Android Architecture Masterclass. You’ll learn all the details of MVC there and see how it applies in real Android application, alongside dependency injection and a bunch of other architectural and design patterns.
As always, leave your comments and questions below, and don’t forget to subscribe to my blog to get notifications about new posts.

Hi,
Thanks for sharing! I am a great fan of your architecture approach and I am personally trying to implement it in my own projects. I like your MVx talks and the approach itself. Recently I have finished one of your curses with the dagger 2 and there are 2 questions I have.
1st Is there any way to abstract listeners for view models just like for FetchQuestionDetailsUseCase when it extends BaseObservable? or are we forced to put registerListener and unregisterListener methods in every ViewModel?
2nd Question is about the repository pattern, how would you put it in to interact with your architecture approach?
Thanks for the answer in advance.
Cheers
Hello Filip,
I’m glad you find my content useful and thanks for your questions.
1)
You can have your own BaseViewModel which extends ViewModel. Put the common logic there and then make all your specific ViewModels extend BaseViewModel.
2)
It depends on what you mean by “repository pattern”. If you mean something like a wrapper around a database (like ORM), then you reference these entities from use cases. However, if you mean something that arbitrates between network data or local data, then you don’t need it. Use cases are the entities that contain business logic, and the logic that governs the caching behavior on the client is part of business requirements. Therefore, you put this kind of arbitration inside use cases.
I am following your tutorials on udemy, and thanks for sharing your knowledge with us. Unit testing and dependency injection tutorials are a life saver. Keep up great work
Vasiliy,
Thank you so much for your courses and articles. I have taken all your courses and have what I have learned has been invaluable and implemented to a great extent many times.
But with that comes a question. You say above that the “activity is the controller”. Yes super surprise for me here. You see, in your architecture course I believe you referred to the activity or fragment as the “glue” not the controller. That description, as distinct from a controller is very important to me. That is, if I would make a VEN diagram, I would have made another bubble for “Glue”.
This comes home in the code for me as follows. In one of my projects, I have a complex title UI element that I wanted to make as it’s own “View”. So my file structure for this is this:
• TitleController : implements TitleUseCase
• TitleUseCase : an interface that when other controllers (from activities) want to blend this element in, it uses this interface to query and set the data.
• TitleView : inherits from FrameLayout. Functions exactly like an Activity or Fragment in your style, creating both the TitleController and TitleViewMvc elements.
• TitleViewMvc
• TitleViewMvcImpl
The nice thing about your structure, is it doesn’t care what the “TitleView” part is. That could just as easily be “TitleActivity” or “TitleFragment”. The controller is created independent from it. That the “Glue” part can be easily swapped out is super nice. Yet this is not something you specifically address in your courses or articles as far as I can find. That is, that way I use the above is something like this. In my MainViewMvcImpl I have these lines:
private val titleView = findViewById(R.id.frame_title)
override val titleUseCase: TitleUseCase = titleView.useCase (again the TitleController implements the TitleUseCase for clarity).
The useCase part is TitleUseCase bit. I like it, but wonder if that is how you would have done it? And what do you think about the “glue” (or equivalent term) description?
Thanks,
Doug
Hello Doug,
Thanks for your feedback on my content and I’m really glad it helps you in your job.
Unfortuantely, I can’t fully draw the picture of your approach in my head from the description. Maybe you’ve got some open-sourced code or gist to demonstrate it?
As for “glue”, you can say that that’s what Activities and Fragments are when you use standalone controllers. However, for me, the idea that controller is just composite component (just like views and models are) is more intuitive. It’s also closer to the fundamental role of Activities and Fragments in Android – they are controllers, and it’s the developers who make them “glue”. In addition, in many applications, when you don’t unit test, it’s reasonable to keep the logic inside Activities/Fragments and just extract the view. Then they are real controllers, not just “glue”.
Regards
Hi Vasiliy,
I’m curious about the way you’re unit testing the use case usage with this architecture approach. Do you have any examples of it? I’ve checked https://github.com/techyourchance/android_mvc_tutorial but it contains no use cases and no tests. https://github.com/techyourchance/android-architecture-course doesn’t have tests and https://github.com/techyourchance/unit-testing-in-android-course doesn’t look like it covers the question as well.
Hello Illia,
I’ve got several unit tests for use cases in the tutorial app for unit testing course. Here you can find one of them.
Thanks, I’ve seen those. I’m more interested in tests for things like https://github.com/techyourchance/android-architecture-course/blob/master/app/src/main/java/com/techyourchance/mvc/screens/questiondetails/QuestionDetailsFragment.java – the stuff that depends on use cases. You will have to mock use case dependencies instead of a use case itself in order to test this logic. I’m curious do you have examples of it.
If you want to unit test controllers, then you’ll need to extract the relevant logic into standalone classes and unit test those. That’s exactly what I demonstrated in unit testing course and you can find the tests for the resulting class here.
Thank you, that’s exactly what I was looking for. So you avoid having an interface for the use case by leaving it non-final and extending it in the test.
With classes being final by default in Kotlin do you make them open as well?
I’m not using Kotlin professionally yet, but I believe that making classes open is the way to go. Extracting interfaces for everything will introduce too much complexity into your codebase.
As far as I’m concerned, the default of having closed classes was an unfortunate trade-off made by Kotlin designers.
I would disagree on a default-open design – it’s an old advise to keep your classes final unless extending them makes sense in the system. Making all classes final by default in Kotlin looks like a good move and a thing learned from a Java experience. Same as having “val” instead of adding “final” to variables. Also it’s a classic “trolley problem” where absence of action is always the default choice – and not making a class final in Java is way easier than making a class open in Kotlin.
While I agree that interfaces sometimes become excessive (and that’s the reason why I was interested in your approach) it feels like an acceptable replacement for open classes. Using an interface is closer to the very idea of supplying different implementations for different cases than extending a class with a completely different behavior.